Dresser

Like any real project there are mishaps that get overlooked. The above picture isn't great, but it does have Jet! I like the picture because it shows how the dresser is actually in use everyday. It matches the lady vanity on the other side of the bathroom door.
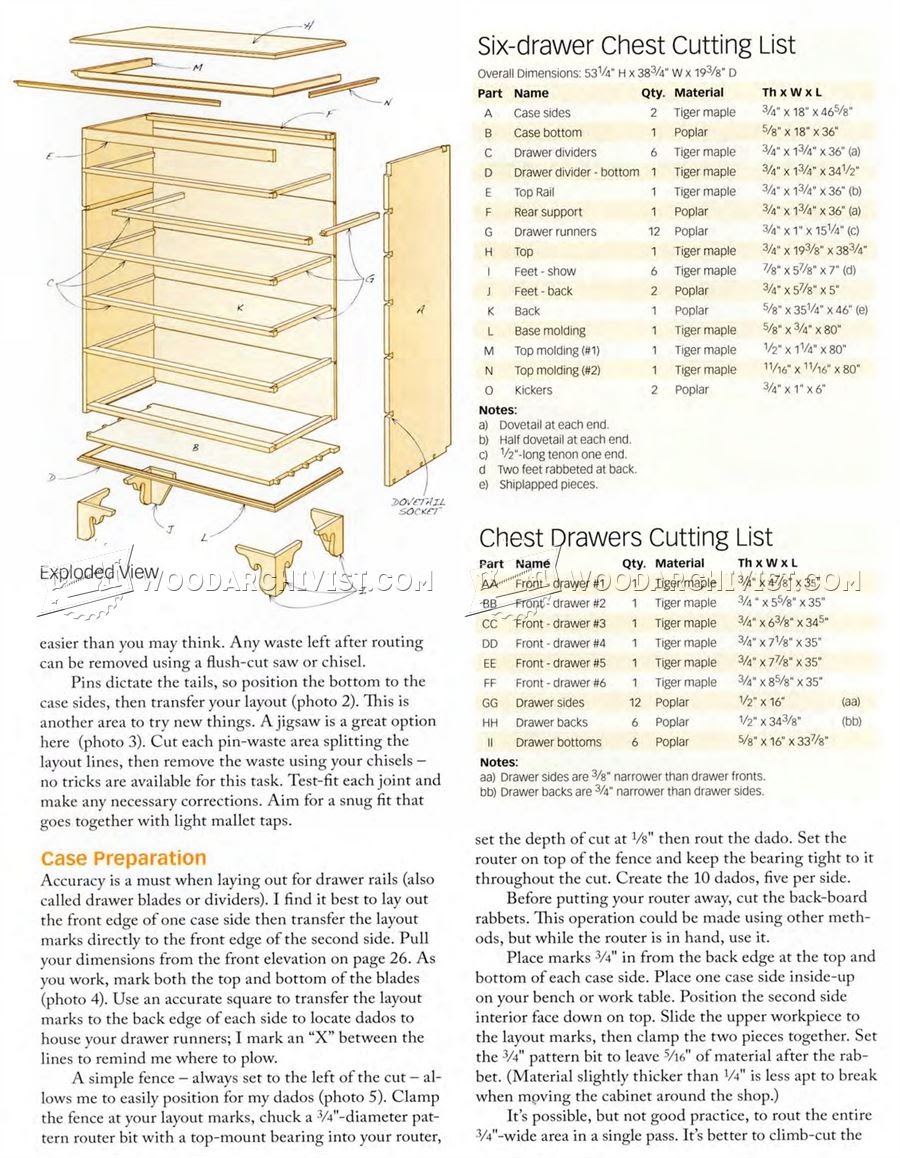

Step 1. How to design a dresser?
These are the plans I started with from the Wood Archivist
They use expensive hardwoods that can be handled differently than the hardwood plywood and English Whitewood I made mine with. English Whitewood is available in reasonable abundance here. It is their construction grade material. Wood is about 30% more expensive here in the UK so watch out. This dresser was not intended to be heirloom quality. One day I will make one from proper hardwood but I needed to give a dresser or two a go without working on 15 quid per board foot English Yew.
Step 2. Design a dresser
I can't find my real plans anymore. I did use the ones above as guides. They made the design much faster. I wanted it big, more tall than wide and with lots of drawers. My wife needs the bottom drawers for her constantly growing amount of seasonal clothes. I measured the distance between my wife hands after she said, "About yea big." Then the real plans were born.
Step 3. The Carcass
 I don't have pictures but the first step was to use dadoes to join the sides of my box. I also placed matching dadoes for the drawer guides on each side (more on the disaster of guides later). The face was assembled and glued separately as shown to the right. I made the drawers taller on bottom and shorter on top.
Below is the probably the first mistake but I didn't know it yet was the moisture content of the Whitewood. The below joinery was with biscuit joints and should have held up fine. I took my time with the top with many layers of sanding, painting and sanding again. To make a nice glass-like finish on top. It worked for about 3 days. The moisture content of the wood was so high we had over a centimeter of shrinkage in 3 days. It split my top!!!

Step 3. The Drawers.
Nothing fancy about the drawers. No dovetails or box joints. Simple rabbits and dadoes. Shhhh...I ran out of 1/4" plywood for the bottoms so I made the last two drawers from 1/2". It looks more purposeful than it is. The right photo is me taking a picture with my phone because I couldn't get this view any other way. The right side needs to come down just a bit.
I suppose this is were I can talk about the drawer guides. They required a total of three boards on each side per drawer and a center post. I imagined a single rail on each side for the bottom sides of the drawer to ride on. Moreover, the plywood for the carcass had a bit of a wave to it. That necessitated each guide to be custom measured for width. This process made the guides by far take the longest and make this project a chore.


Step 4. Everything Else
The rules of the internet have always been if you don't have a picture or a video it didn't really happen. So, my dresser didn't really get fixed with drawer fronts and handles. I didn't really make 20 little trapezoidal pieces and joined them together to make the legs. I didn't really paint the dresser with some mis-tint paint from B&Q that happened to perfectly match my wife's dresser. Those things didn't really happen but somehow I use this dresser everyday. In fact, I need to use it now. I have constructed this post in my...ahem...well you get the idea.
This was a fun project. I won't use construction grade lumber in the UK for projects like this anymore without a moisture meter. I have considered remaking the top. It have a split down the center of it. I don't think I will. Until my coins fall into my top drawer.


Jet looks amazing!
ReplyDeleteAt least you got something out of this post
ReplyDeleteBEAUTIFUL id like to know more about your drawer guides and how well they work.
ReplyDelete