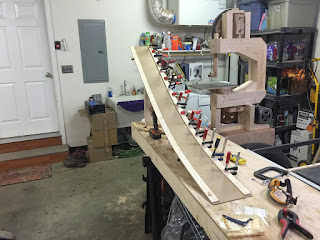
Fun Size Derby track
How to build a derby track.

 There isn't much about this track that makes sense. If you have a question about it, don't. There is no answer except one. Jacob.
Step One -- Make a gradual curve.
The engineer in me found this part interesting. How can I make a gradually curved track?I had some hardboard lying around from Rich. It was actually the packing material for his sauna (I'll take it!). It happened to be about 10" wide, 8' long and thin enough to bend easily.
 I got a right triangle on my workbench with a 30" 2x4 and a couple of shots with the nail gun. The interesting part came here.
I placed an eyelet about 20" up from the bottom of the triangle and another on the workbench. I tied the eyelets together. As I twisted the twine it drew the eyelets together and created a gradual curve to the newly minted track.
If you care about things like accuracy and/or adherence to boy-scout rule standards then do not follow this.

With two small strips, you can build a rail to keep the cars on the track and hold the shape. All it takes is a little glue and a lot of clamps.

 There is a lot going on in these pictures. One has the block of unhewn wood for Jacob's car! Track before the car. This projects was all started because he thought making a Derby car was "lame." I guess it is much more fun to construct things in Minecraft than in the real world.
Step Two -- Paint.
 |
 |
| Good Job Jacob |
 Painting interested him. He even found a partner. Hint...setup makeshift spray booths for kids. They will paint everything. Charlotte made herself a house. Her house had luxuries that I'll never have.
He did a good job. Jacob and I put our heads together and the easiest way to have lanes on the track was splitting some yellow duct tape pieces. It worked great. I wish I had some video of the cars racing down. In fact I wish I had media of us building the cars. Maybe Grandma can contribute with some blurry pictures.


Post a Comment